Thursday, 31 December 2015

Do-It-Yourself Tutu and Snowflakes


For Christmas celebration at church, we decided to make our own Tutu skirts for our Christmas performance. Tutu can be constructed without sewing. 

To make a tutu you will only  be needing tulle and elastic band. I got my tulle at A to Z Wedding House right here in Penang. 

So the basic of making tutu is;

1. Make the elastic waistband. Measure your waist and tie the ends. 
2. Cut the tulle. I cut 6" wide and 22" long. You can customized to your own liking.
3. Attach tulle to elastic band. Basically you just have to tie the tulle along the elastic band.

Refer to this instruction from Youtube by SoCraftastic.


Notice the snowflakes hanging from the ceiling. I love making those! 3D snowflakes are great and easy decoration you can make using just white paper.

Source


Merry Christmas and Happy New Year everyone!


Tuesday, 15 December 2015

Dinner Planner


Materials and Tools

* decorative paper
* Ink-Jet magnet paper
* metal ruler
* scissor
* craft knife
* self healing cutting mat
* spray adhesive
* glue stick
* computer  
* ink-jet printer

Instructions


1. Create heading
Cut a sheet of patterned paper to 81/2" × 11" ( 22 cm x 28 cm) and, using a computer, print the title. You can add decorative or geometric design and print the title inside the design. Set aside.


2. Create weekly table
Create a table by using a computer with the days of the week along the lefhand column and the headings (Main Dish, Side Dish, Vegetable and Dessert) along the top row. Each table cell is about 4 cm x 3 cm. 


3. Cut paper strips
Cut 4 strips of 4 cm x 22 cm strips of colored-paper.


4. Cut magnet paper
Cut a piece of ink-jet magnet paper to 18 cm x 22cm.


5. Mount paper strips
Apply spray adhesives to one side of the colored strips on step 3. Mount this strips vertically, side by side, onto the black side of the magnet sheet.


6. Cut first set of narrow paper strips
Cut three 22cm x 6mm strips fo polka-dot paper or any patterned paper you like.


7. Cut second set of narrow paper strips
Trim six 18cm x 8mm strips of striped paper of any paper patterned you like.


8. Mount magnet to paper
Apply spray adhesives to the back of the magnetic section prepared in step 5 to the paper with the weekly table in step 2.


9. Mount horizontal strips
Using a glue stick, mount the six striped paper strips (in step 7) horizontally across the four colored strips.


10. Mount vertical strips
Using a glue stick, mount the paper strips from step 6 vertically and at regular intervals.


11. Cut paper base
Cut a piece of pink-patterned paper to 24 cm x 30 cm.


12. Mount table and title to base paper
Position and mount with spray adhesives the weekly table and the title, centered on the pink-patterned paper on step 11.


13. Print dish magnets
Using a computer and printer, design and print 19mm x 4cm cell box on ink-jet magnetic paper a selection of menu choices. Cut out each dish magnet and place it on chart as desired. 

There you go! Now you have a meal organizer that makes planning a week's worth of dinners a piece of cake.


Thursday, 10 December 2015

Easy and Cheap DIY Christmas Wreath

Christmas is my favorite season to diy. All the endless possibilities to create christmas decorations out of all kind of paper; patterned paper, tissue paper even newspaper just excites me. 

I always want to make a Christmas wreath. Found tons of tutorial online but this one can be done within 1 or 2 hours.

Tutorial are from http://www.dltk-holidays.com/xmas/mplatewreath2.html

Materials:
  • paper plate (I cut a circle out of used cardboard box)
  • glue,
  • scissors,
  • 1 to 2 inch squares of green or red (or your choice of color) tissue paper.

Instructions:

  • Cut the tissue paper into 1 to 2 inch squares.
  • Cut the center out of the paper plate to leave a round "donut" shape.  This will form the base of the wreath.
  • Wrap each square of tissue paper over the top of a pencil, dip in glue and stick it to the paper plate.
  • Continue until you have filled the entire plate with tissue to create your wreath.
Glue ornaments on the finished wreath. I got my ornaments at Mr. DIY where you can find affordable Christmas decorations.

Enjoy making yours!


Sunday, 8 November 2015

Life Hack for Sweaty Underarms


Every Sunday when I go to Church service I always make sure that I wear  dark shirt or dress. Church service can sometime go for 4 hours as we have a lot of activities. This month we are having practices for Christmas celebration so it’s going to be a lot of sweating involved.

I sweat a lot that’s why I used a lot of anti-perspiration deodorant. Recently there’s a lot of scare going on about deodorant that caused cancer in later life. Although there is no real evidence but I might just go slow on this entire chemical. So I decided to go free and used less of deodorant…but I still do sweat. So I had to pick the type of fabric and color I used on a hot afternoon day.

There’s a lot of hack on the internet on to prevent embarrassment of sweat stains. Life hacks are my favorite tips and trick to save on my pinterest.

And I found this…use an ultra-thin pantyliner on your sleeve to absorb sweat. But make sure that it sticks well to your sleeve. Once I used a cheap pantyliner and on the way to Church I noticed something bulky down my arm (I was wearing a long sleeve shirt). Upon checking it was pantyliner sticking comfortably down my sleeve. So make sure it does stick to the sleeve.

And if you are wearing short sleeved shirt, cut the pantyliner in half before applying them.


Saturday, 26 September 2015

Homemade Pizza with Homemade Tortilla Wrap


I love pizza and I love making pizza dough. But sometimes eating pizza makes me too full and eventually I only managed to eat two slice and scraped the topping to eat and just throw out the bread.

So what better way to enjoy the delicious topping and still consider it as a pizza? Use a super thin crust pizza!...Or a tortilla wrap! It super crunchy and delicious with your choice of topping.


Original recipe from The Cafe Sucre Farine.

Ingredients:
  • 3 cups flour
  • 1 teaspoon salt
  • 1 teaspoon baking powder
  • ⅓ cup vegetable oil
  • 1 cup warm water
Ingredients:
1. Combine and mix flour, salt and baking powder in the bowl. Add oil and water. Mix with a mixer for 1 minute or you can just use your hands. stopping several timesto scrape the sides of the bowl. After about 1 Continue to mix until dough is smooth.


2. Transfer from mixing bowl to a well-floured work surface. Divide dough in half, then in half again. Continue until you have 16 fairly equal portions. Form each piece into a ball and flatten with the palm of your hand as much as possible. If dough is sticky, use a bit more flour. Cover flattened balls of dough with a clean kitchen towel and allow to rest for 15 minutes before proceeding.

3. After rest period, heat a large pan over medium-high heat. Roll each dough piece into a rough circle, about 6-7 inches in diameter, keep work surface and rolling pin lightly floured. Don’t stack uncooked tortillas on top of each other or they will get soggy.

4. Serve warm or allow to cool for later use. When ready to use, place a slightly damp paper towel in the bottom of a container (with a cover) that will hold the stacked tortillas. Microwave, uncovered for 15-25 seconds (start with 15) or until warm, then cover to hold heat while serving.


Note: The tortillas will keep well stored in an airtight container or zippered bag at at room temperature for 24 hours or can be frozen indefinitely. To freeze, separate tortillas with parchment paper or waxed paper and place in a zippered bag before placing in freezer.


Enjoy and happy cooking!

Thursday, 24 September 2015

Missionary Ship Called Logos Hope


This week was the September school holiday. So off we go for an adventure....or not. With the crazy on and off haze going on here in Penang it's impossible to not go out and have irritated eyes and throat. 

But we heard about this floating book fair, it's the world's largest and it is on board a ship called MV Logos Hope. It travel worldwide and has visited 60 countries since it started to sail. I of course couldn't resist any bookfair. So geared with face masks, we head to Penang island.


All aboard! Right...here we go...It's a long walk from the parking area to Swettenham Pier. 


The entrance and exit. Quite a crowd today. It's fascinating to see the red lifeboat stands out from the white cruise ship.


So from the entrance, we came to this. A seated area with a tv screen in front and a lady (a very cute lady standing maybe just 5 feet tall) giving information about the Logos Hope. I come to know that it is actually a missionary ship. And upon entering the bookstore, I found that, although they are selling all kinds of books but they have this large area where they have Christian books and CDs. 

Children are mostly attracted to the above ship simulation.


Maybe a replica of the crew's bedroom. This was somewhere at the entrance after the seated area. Nice comfy double-decker bed with a bookcase, cupboard and also a desk.


If you zoom to the book on the table it is actually a Bible.


Here's the bookstore. I think the price was ok but a tad expensive then the Big Bad Wolf (BBW) Sales. Since BBW book sales is coming again so I better go easy here. I bought a Christian CD, the Logos Hope poster and a keychain and a few books for my son.

They are also selling toys, souvenirs and almost all kind of books.


A few snapshots for memories before we go. 


And upon walking to the parking area...we came to this. Flocks of pigeon land and pooping on several cars....luckily not ours. 

But do you know that there is a superstitions that bird poop brings good luck?

Ok......

Wednesday, 12 August 2015

Bagaimana membuat Pasu Bunga yang murah dan unik!


Bagi sesiapa yang sukakan DIY dan juga sukakan bunga, idea ini sangat mudah dan mengambil masa yang amatlah tidak panjang. Sekarang tidak perlulah membeli segala pasu bunga yang fancy bagai, anda hanya perlu custom kan barang-barang yang ada di rumah mengikut kreativiti anda sendiri.


Sumber


Bahan-bahan yang diperlukan;

1. Tin makanan (bole guna tin tuna atau tin susu junjung, kalau mau yang comel gunalah tin tuna)

2. Penyepit kain yang diperbuat daripada kayu (yang ni rasanya di Malaysia dah jarang orang jual penyepit kain yang diperbuat daripada kayu kecuali di kedai yang menjual barang-barang dari China. Kalau tidak ada yang kayu yang diperbuat daripada plastik pun boleh)


3. Bahan-bahan untuk menanam bunga seperti tanah dan biji benih. 


Cara-cara (tengok dari gambar lagi senang kan...)

1. Sepitkan penyepit kain di sekeliling tin makanan.
2. Tanam bunga di dalam tin.

Boleh juga gunakan pasu bunga ini sebagai candle holder atau pemegang lilin. Gunakan tea light (lilin yang biasa orang gunakan dalam aromatherapy) atau apa jenis lilin pun boleh.


Sumber


Jika menggunakan penyepit kain plastik nampak lagi colourful kan?

Pasu bunga macam ini amatlah sesuai ditanam dengan pokok herba. Bolehlah simpan di belakang dapur dan jika hendak masa cuma petik saja. 


Sumber

Kalau ada yang mau menghiaskan penyepit kain yang memang tidak ada corak itu, boleh gunakan glitter. 


Sumber


Atau boleh juga menggunakan butang untuk menghias.


Sumber

Gunakan warna air untuk warnakan permukaan penyepit kain.


Sumber


Atau lebih senang, gunakan washi tape untuk menghias pasu bunga tersebut. Washi tape boleh didapati di kedai-kedai buku atau kedai kraf.


Idea lain selain daripada penyepit kain boleh juga mengguna ranting-ranting kayu yang ada di sekeliling rumah. Gunakan tali yang lebih kurang sama warnanya dengan ranting kayu dan ikat keliling sebagai sokongan.


Sumber

Selamat mencuba!


Wednesday, 24 June 2015

Decoupage - Seni Kraf Koyak dan Gam

Decoupage dipronounce atau disebut sebagai day-ku-paj’. Biasa masa kita di tadika mesti ada kraf yang hampir sama dengan decoupage kan? Skil ini cikgu akan ajar di mana kita koyak kan kertas berwarna lepas tu gam pada permukaan kertas atau mengikut bentuk. Tapi kalau tidak silap masa sekolah ini dipanggil ‘collages’.

Teknik decoupage juga hampir sama ialah salah satu seni dekorasi di mana kertas ditampal ke atas permukaan dengan menggunakan medium seperti gam. Proses ini nampak sangat mudah dan ‘straight forward’ tetapi idea yang penting dalam seni dekorasi ini ialah permukaan yang ditampal dengan kertas hiasan ini mestilah halus atau licin.

Untuk yang baru pertama kali mempelajari teknik dekorasi ini, pilih corak yang mudah yang tidak memerlukan anda memotong dengan teliti supaya anda boleh menumpukan teknik itu sendiri. Bahan-bahan yang diperlukan dalam kraf ini tidaklah banyak. Cukup sekadar gam dan gunting serta berus cat. Tetapi jika ingin kemasan yang halus, cantik dan tahan lama, anda memerlukan lebih dari itu.


OBJEK YANG BOLE DI DECOUPAGE KAN

Di sini ada beberapa idea barang-barang rumah dalam dan luar yang kita boleh decoupagekan.

Apa juga perabot di rumah bole di decoupagekan. Yang penting permukaan perabot mestilah kebanyakan rata. Idea perabot yang bole decoupage ialah;

1.  Dresser - Nampak cantik kan kalau dresser yang boring warnanya  atau plain bolehlah dihias dengan apa jua corak yang kita suka seperti corak lembut dan berbunga seperti di bawah. 


2.  Wardrobe pakaian – Kebiasaan almari pakaian kita samada corak plain kayu atau english stail atau apa juga corak yang simple. Bagi sesiapa yang suka corak yang lain dari yang lain contohnya corak geometri memang susah hendak cari perabot seperti itu di pasaran. Jadi apa kata hias sendiri almari pakaian anda. Anda tidak perlu decoupage keseluruhan permukaan almari cukup hanya anda susun corak-corak yang telah di gunting mengikut kreativiiti anda sendiri. Seperti contoh di bawah ini;

Sumber

3.   Katil Bayi - katil bayi yang sememangnya kebanyakan terdapat dalam corak plain lembut bolehlah digubahkan dengan seni decoupage dengan mengunakan imej binatang yang comel.

Sumber

4.  Meja Kopi - Bagi yang minat stail 'English' atau stail 'cottage' bolehlah menggubah meja kayu yang lama kepada yang baru dengan hanya menggunakan seni dekorasi decoupage.

Sumber

5. Rak Kasut - Wah, mesti ramai akan tertanya-tanya di mana mendapatkan rak kasut yang unik seperti ini. Kawan-kawan mesti terkejut corak rak kasut ini hanyalah dibuat di rumah.

Sumber

Selain itu benda-benda lain yang boleh decoupage ialah seperti;


6.   Bingkai gambar - bingkai gambar kebiasaanya memang hanya dalam corak plain. Ceriakan bingkai gambar dengan teknik decoupage.

Sumber

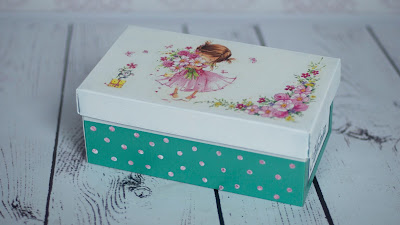
7.  Kotak kasut -  Kotak kasut anda simpan daripada dibiar bersepah bolehlah di decoupage kan supaya menjadi storage box yang comel.

Sumber

8. Kotak simpanan barang – Kotak simpanan barang bole di decoupage kan dan jadikannya sebagai kotak hadiah. Nampak unik sekali kan? Design yang nampak seperti dilukis dan dicat rupanya hanya imej yang dilekat pada kotak tersebut.

Sumber

9.  Piring – samada piring untuk hiasan dinding atau piring untuk makan pun boleh.

Sumber

Idea decoupage piring yang digunakan untuk makan ialah dengan mengunakan piring kaca yang tidak berwarna dan kertas berwarna atau corak-corak di tampal pada bahagian belakang piring. Tapi perlu di ingat kan piring ini tidak boleh digosok dengan kasar dan hanya guna ia untuk serve snack atau bahan-bahan yang kering.

Sumber

10. Pasu bunga pun boleh decoupage kan. Tetapi kena ingat pasu bunga itu kita tanam bunga dan siram dengan air so kenala permukaan decoupage itu kalis air. Jadi kena pastikan sebelum memulakan decoupage kena cat dengan varnish dahulu dan selepas proses decoupage kena cat sekali lagi dengan varnish.

Sumber
  
11.Jangan hairan, aksesori pun bole decoupage kan.
Gelang, headband rambut mahupun anting-anting. Yang penting usaha dan kerajinan anda untuk menampal di bahagian yang kecil.

Sumber


KERTAS YANG SESUAI DIGUNAKAN UNTUK PROJEK DECOUPAGE

Apa jua jenis kertas boleh digunakan, samada nipis atau tebal. Tiada had dalam pemilihan kertas.

-          Napkin
-          Fabrik
-          Poster
-          Majalah
-          Keratan akhbar
-          Decorative paper (seperti kertas scrapbook)
-          Kertas tisu
-          Peta
-          Wrapping paper
-          Catalog
-          Anda juga boleh guna gambar anda sendiri dengan mencetak

Ok cukup dengan apa objek-objek yang anda boleh guna untuk decoupage dan jenis kertas yang digunakan, mari tengok apa material yang perlu untuk projek ini.

Material untuk decoupage ialah;

  • Objek untuk decoupage.
  • Kertas hiasan
  • Gunting
  • Berus Cat
  • Gam decoupage (seperti Mod Podge; boleh didapati online seperti www.multifilla.com) atau apa jua jenis gam yang berasaskan air.
  • Primer (seperti Gesso) atau cat primer lain seperti emulsion paint yang boleh didapati di kedai hardware – untuk mengecat objek sebagai persediaan untuk decoupage.
  • Varnish (hanya jika anda menggunakan gam selain dari gam decoupage sebab gam ini bertindak sebagai varnish juga) ataupun sealer – untuk membuat corak decoupage lebih tahan lama.
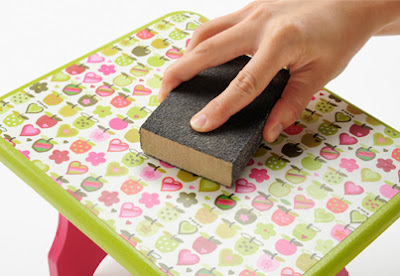
  • Kertas Pasir (jika perlu untuk menghaluskan permukaan terutamanya perabot)


Semua bahan ini anda bole dapati di kedai kraf seperti www.multifilla.com. My Little Gift Shoppe ada menjual set decoupage ini juga.


CARA-CARA UNTUK DECOUPAGE 

1.  Sediakan permukaan untuk decoupage. Hampir semua jenis permukaan boleh digunakan untuk projek decoupage. Permukaan yang sesuai ialah seperti kayu, ‘papier mache’ (seni atau kraf untuk membentuk atau melapis objek 3D menggunakan kertas yang telah dikoyak-koyakkan), terra cotta (tanah liat), tin, kadbod atau permukaan kaca. Permukaan plastik kurang sesuai untuk decoupage, walau bagaimanapun, cuba untuk decoupage sebahagian kecil untuk cuba samada anda berpuas hati dengan hasil nya.


2.  Cat permukaan dengan cat primer supaya senang untuk decoupage (walau bagaimanapun, langkah ini hanya pilihan jika objek tersebut tidak mempunyai sebarang corak pada dasarnya). Bole terus ke langkah 3.


3. Sediakan kertas hiasan anda. Gunting mengikut ukuran permukaan objek. Ukur dengan pembaris jika perlu. Tips untuk kertas-kertas hiasan yang pelbagai;

·         Fabrik – Cuci dan keringkan fabrik tersebut (jangan guna pelembut kain). Seterika jika perlu. Dengan menggunakan berus, sapu sedikit gam decoupage dan biarkan kering. Tujuannya untuk memudahkan anda gunting fabrik tersebut.
·         Kertas – Hampir semua jenis kertas terutama kertas yang tebal atau kertas scrapbook, boleh diletakkan dengan gam decoupage. Untuk kertas yang lebih nipis dan kertas yang telah dicetak dengan imej anda menggunakan pencetak, spray kertas menggunakan clear acrylic sealer (terdapat dalam botol spray) terlebih dahulu supaya ia menjadi sedikit keras.
·         Kertas tisu – Kertas tisu yang sememangnya nipis akan membuatkan kertas berkerut jika disapu dengan gam. Kesan ini sebenarnya membuat projek decoupage anda lebih menarik. Lapiskan sahaja kertas tisu tersebut dan apabila kering sepenuhnya gosok dengan kertas pasir. Ulangi proses ini sehingga anda berpuas hati dengan kesan decoupage dari kertas tisu tersebut.


4.  Sapukan gam dengan secukupnya pada permukaan objek. 


5. Lapiskan dengan kertas hiasan anda. Sapu setiap inci permukaan dengan tangan atau kain yang sedikit lembab supaya tiada udara terperangkap di dalam. Dan yang paling penting, biarkan kering selama 15-20 minit.


      Tips: Gunakan objek jika perlu untuk mendapat kesan decoupage yang rata. Sapu dari tengah ke bahagian luar.


6.  Sapukan gam decoupage di atas kertas hiasan yang telah dilapis tadi. Biarkan kering dan sapu sekali lagi. Jumlah sapuan gam terpulang kepada anda tapi kami rekomen sebanyak dua lapisan sahaja. Biarkan kering semalaman.

Langkah terakhir ialah dengan mengecat menggunakan varnish supaya kesan decoupage lebih tahan lama. Biarkan kering sekurang-kurang 2 jam sebelum lapisan kedua varnish.


Tips: Selepas sapuan varnish tadi, gosok permukaan decoupage tadi menggunakan kertas pasir supaya tampak lebih lembut dan ulang proses mengecat varnish sehingga anda puas hati dengan hasilnya. Ulang proses mengikut jenis kertas hiasan yang anda gunakan. Lagi tebal kertas hiasan, lagi banyak anda perlu ulang proses ini. 

Jangan risau jika perlu ulang proses ini sebanyak mungkin. Proses ini akan membuat permukaan decoupage lebih halus dan tahan lama.


Sumber Tutorial: 

TIPS-TIPS UNTUK DECOUPAGE

1.       Jangan risau jika menggunakan gam seperti PVA atau Mod Podge permukaan yang di cat akan kelihatan pudar. Selepas kering gam akan menjadi transparent dan corak pun akan kelihatan terang.
2.       Jika menggunakan gam PVA atau Mod Podge pastikan cat lagi dengan varnish supaya permukaan corak itu tahan lama.
3.       Jika menggunakan fabrik sebagai bahan untuk decoupage, pastikan permukaan fabric diseterika terlebih dahulu.


SELAMAT BERKRAF!