Monday, 9 April 2018

Build a Fort Castle from Cardboard


So my son has been asking me to build him a fort castle. I hesitate because it would take me hours. But after a few days of keep on showing me photos of the fort castle that he wanted I finally agreed to make him one. And so, around the town we go looking for cardboard. We got it at our grocery store for free and then went back to start with our project.


Source

And so this is the photo he showed me. And this is how I decided on how it should be. Just a simple square that act as his playpen of playhouse since I'm not convinced that he would spend all his time there. And sure enough, after hours of making a children size cardboard fort, he placed all his stuff toys and his favourite cars inside and left it just as it is until today. Once in a while he would show the fort to his friends but that's just about it. But it's ok, I got a new title for my blogpost then.


This is the entrance and he named his fort castle 'Pagavi Castle'. 


The size of this diy playpen is 40 inch x 50 inch and 32 inch in height and I used about 4 medium boxes. In order to attach the edges of the boxes I used hot glue gun as it dries very fast and then you can move to the other section to work on.


The tower is just enough for him stand and peek through the small window. But as I say at the beginning, this whole-afternoon-diy-project is left in playroom never to be used until God knows when.


Thursday, 5 April 2018

DIY Hamster Hideout


Introducing our new family member, Olive the Roborovski hamster or dwarf hamster. Apparently my boy got it's name from the cartoon Popeye the Sailorman. 

We got ourselves a Syrian hamster too which to be introduced later on.

Olive is very small and fast. Although you can pet her it's best just to observe her because she can be quite jumpy by the slightest sound. Even though we had her for 2 months now, she is still scared of human touch. 

Since little Olive is such a scaredy cat I built her a hideout. I bought the little hideout for less than RM5.00 at a pet shop since it's an old stock. And decided to 'renovate' the little cage. 


Little Olive loves to peek through her little window. 


The second floor with wide opening which I use to store her food. 


There she goes looking for food.


With ice-cream, I aligned the stick to build her stair to the top floor. 


Using ice-cream stick and drawer partition, I built the first floor with very small opening. 


This is a just a simple design using a plastic house. You can build yours from scratch using cardboard too. 


Monday, 7 August 2017

Handmade Accessories - Two-tone Flowery Hairpin


Create this gorgeous two-tone hair accessories using you choice of fabric flowers. It is easy to make and and you'll be able to pick your choice of color accordingly with your style.


You'll be needing;
  • Two-tone color fabric flowers with large petals and smalls one
  • Hairclip or large bobby pins
  • Scissor
  • Felt
  • Hot glue gun
Make a circle using felt for the base for the flowers. Cut the dark colored flower from its stem and carefully pull of the plastic base. Separate and cut each petal and hot-glue on the circular felt. Make sure you don't stack petals on top of each other, rather arrange it just like a flower.

Cut the lighter colored, smaller flower from its stem. 

You can either use the stems and hot-glue them on. Arrange flower side by side. 

                                                           
Lastly, apply hot glue on felt base and attach hairpin or bobby pins.


Pretty, right?


Friday, 4 August 2017

Diy Toy - Rocket Ship From Plastic Bottle


Diy toys are fairly easy and inexpensive to make. These are perfect to give children handmade gifts at Christmas, birthday or any day!


To make a rocket ship from a recycle bottle, you'll be needing;
  • 1 recycle small bottle
  • 1 children sock
  • Glue gun
  • Mod podge or water glue
  • Scissor
  • Silver masking tape
  • Red, yellow and orange yarn
  • Cardboard and felt (not in picture, you'll be needing this to make a circle, fins and for the bottom tube)
  • Aluminum foil
Slip the sock over the bottle. Using glue gun, fold the bottom of the sock under the bottle and hot glue the sock. (For option, use mod podge or water glue and dab it on the surface of the bottle before slipping on the sock)

For this part, use cardboard, felt and aluminum foil. Cut two circles from the felt and glue to the front of the bottle as window. Cut two more circles smaller than the latter and cover it with aluminum foil. Adhere on top of the previously attached circles.

Using cardboard, make 3 pieces tube or otherwise you can use tissue tube. Cover tubes with aluminum foil, secure edges with silver masking tape and adhere to bottom of rocket with hot glue.

Cut three matching fin shape out of cardboard and hot glue them to the side of bottom edges of the rocket.

Wind orange yarn around your hand (around 5-6 times), repeat using the yellow and red yarn, slip it off your hand and tie in the middle. Glue inside one of the tubes. Repeat process with the other tube.


Make this with your children and let them enjoy making their own handmade toys!

Thursday, 18 May 2017

Squeeze Your Stress Away


I’m a full time mom doing part time home-based gift business and occasionally doing artwork for my homemade gift or artwork for church.
Stress is inevitable whether you are a student, working mom or housewife. One sure way I go through my stressful days is by crocheting (apart from praying). The repetitive action of crochet distracts me from whatever issues I had at the moment.
Nowadays, it seems everybody is stressed out.
A more easy quick way is to use a stress ball. The act of squeezing and stretching stress ball somehow ease you. You can also use these stress ball for your kids as well.
Find out how to make one here.
Have fun!

Tuesday, 14 June 2016

Bookmark Your Book with Love! DIY Penanda Buku Berbentuk Hati


Origami penanda buku ini sangat senang. Hanya perlu saiz kertas yang bersesuaian dan mestilah dalam bentuk segi empat. Guna kertas berwarna supaya lebih menarik atau recyle majalah yang ada di rumah.
Let’s get started! Hanya ikut diagram di bawah.
1. Langkah pertama ialah untuk mendapatkan crease atau lipatan.
2. Ikut diagram di bawah supaya lipatan menjadi bentuk segi tiga.

3. Langkah di bawah juga hanya untuk mendapatkan crease atau lipatan. Setelah crease dibentuk, buka kembali lipatan tersebut.


4. Ikut diagram di bawah untuk langkah seterusnya.


5. Tiga diagram di bawah adalah untuk membentuk bahagian atas bentuk hati.


6. Setelah itu, buka lipatan seperti di bawah untuk mendedahkan penanda buku bentuk buku yang telah pun siap.


Selamat berkraf!

Original idea of this tutorial is from The Cheese Thief.

Sunday, 5 June 2016

Driving in My Toy Car


You must have boxes all around the house and think what else you can do with it other than as storage. Why not make a toy car for you child and ask them to imagine what color and type of car would they like to make. This craft is easy and cheap as you will be only needing recycle materials.
So, let’s get started!

Supplies:

  • A cardboard box large enough to fit a child
  • Scissor and penknife
  • Permanent Marker
  • Double tape or hotglue
  • Colour wrapping paper
  • Recycle materials such as plastic cup, plastic lid and tissue tube
  • Scrap fabric or ribbon (for car strap)

Direction:

Step 1: Prepare car body. Cut all the flap off the bottom of the box. Cut the flaps at the top of the box in half. Wrap box with the colored paper.

Step 2: Prepare car body parts such as wheels, headlight and rear light, bumper and also grill.


Using permanent marker, draw lines on the car body for the doors. Use scrap fabric or ribbon for the shoulder strap. Attach to the box and adjust the length so it hang at the right height. I use paper plate as the steering wheel. Decorate according to your preference.


Wednesday, 2 March 2016

Nesting Storage Containers


Materials and Tools
* 30cm x 30cm sheets of thick scrapbook paper or patterned paper
* Brown satin ribbon
* Green rope cord 
* Metal ruler
* Bone folder
* Scissors
* Small hole punch


1. SCORE PAPER

Measure 5cm from edge of the patterned paper, then with a bone folder, score a line along the edge of metal ruler. Repeat with the three remaining sides, running each score line all the way across the paper.


2. FOLD SIDES AND PINCH CORNER

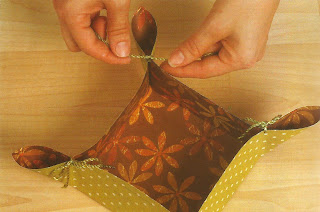
Fold up the sides of the box along the scored lines. Pinch together one corner where the scored lines intersect, as shown.


3. PUNCH HOLE THROUGH CORNER

While still pinching the paper together, punch a hole through the corner point.


4. SECURE CORNER WITH RIBBON

Run a length of satin ribbon through the hole, then tie it in a bow to secure the corner. Pinch, punch and tie the three remaining corners.


5. CREATE A SMALL CONTAINER

Trim one sheet of the patterned paper to 23 cm x 23cm. Repeat steps 1-4 with this paper to create a smaller nesting container, this time using green cording to secure the corners. When finished, place the smaller container in the larger one, or fill each container as desired.

Happy Crafting!

*Tutorial from the book Paper Everyday by Laurie Dewberry.