Monday, 9 April 2018

Build a Fort Castle from Cardboard


So my son has been asking me to build him a fort castle. I hesitate because it would take me hours. But after a few days of keep on showing me photos of the fort castle that he wanted I finally agreed to make him one. And so, around the town we go looking for cardboard. We got it at our grocery store for free and then went back to start with our project.


Source

And so this is the photo he showed me. And this is how I decided on how it should be. Just a simple square that act as his playpen of playhouse since I'm not convinced that he would spend all his time there. And sure enough, after hours of making a children size cardboard fort, he placed all his stuff toys and his favourite cars inside and left it just as it is until today. Once in a while he would show the fort to his friends but that's just about it. But it's ok, I got a new title for my blogpost then.


This is the entrance and he named his fort castle 'Pagavi Castle'. 


The size of this diy playpen is 40 inch x 50 inch and 32 inch in height and I used about 4 medium boxes. In order to attach the edges of the boxes I used hot glue gun as it dries very fast and then you can move to the other section to work on.


The tower is just enough for him stand and peek through the small window. But as I say at the beginning, this whole-afternoon-diy-project is left in playroom never to be used until God knows when.


Tuesday, 14 June 2016

Bookmark Your Book with Love! DIY Penanda Buku Berbentuk Hati


Origami penanda buku ini sangat senang. Hanya perlu saiz kertas yang bersesuaian dan mestilah dalam bentuk segi empat. Guna kertas berwarna supaya lebih menarik atau recyle majalah yang ada di rumah.
Let’s get started! Hanya ikut diagram di bawah.
1. Langkah pertama ialah untuk mendapatkan crease atau lipatan.
2. Ikut diagram di bawah supaya lipatan menjadi bentuk segi tiga.

3. Langkah di bawah juga hanya untuk mendapatkan crease atau lipatan. Setelah crease dibentuk, buka kembali lipatan tersebut.


4. Ikut diagram di bawah untuk langkah seterusnya.


5. Tiga diagram di bawah adalah untuk membentuk bahagian atas bentuk hati.


6. Setelah itu, buka lipatan seperti di bawah untuk mendedahkan penanda buku bentuk buku yang telah pun siap.


Selamat berkraf!

Original idea of this tutorial is from The Cheese Thief.

Wednesday, 2 March 2016

Nesting Storage Containers


Materials and Tools
* 30cm x 30cm sheets of thick scrapbook paper or patterned paper
* Brown satin ribbon
* Green rope cord 
* Metal ruler
* Bone folder
* Scissors
* Small hole punch


1. SCORE PAPER

Measure 5cm from edge of the patterned paper, then with a bone folder, score a line along the edge of metal ruler. Repeat with the three remaining sides, running each score line all the way across the paper.


2. FOLD SIDES AND PINCH CORNER

Fold up the sides of the box along the scored lines. Pinch together one corner where the scored lines intersect, as shown.


3. PUNCH HOLE THROUGH CORNER

While still pinching the paper together, punch a hole through the corner point.


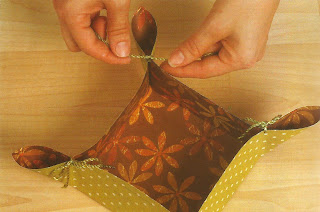
4. SECURE CORNER WITH RIBBON

Run a length of satin ribbon through the hole, then tie it in a bow to secure the corner. Pinch, punch and tie the three remaining corners.


5. CREATE A SMALL CONTAINER

Trim one sheet of the patterned paper to 23 cm x 23cm. Repeat steps 1-4 with this paper to create a smaller nesting container, this time using green cording to secure the corners. When finished, place the smaller container in the larger one, or fill each container as desired.

Happy Crafting!

*Tutorial from the book Paper Everyday by Laurie Dewberry. 

Sunday, 14 June 2015

Bookmark your Book with Love! DIY Penanda Buku Berbentuk Hati.


Origami penanda buku ini sangat senang. Hanya perlu saiz kertas yang bersesuaian dan mestilah dalam bentuk segi empat. Guna kertas berwarna supaya lebih menarik atau recyle majalah yang ada di rumah.

Let's get started! Hanya ikut diagram di bawah.


1. Langkah pertama ialah untuk mendapatkan crease atau lipatan.


2. Ikut diagram di bawah supaya lipatan menjadi bentuk segi tiga.


3. Langkah di bawah juga hanya untuk mendapatkan crease atau lipatan. Setelah crease dibentuk, buka kembali lipatan tersebut.


4. Ikut diagram di bawah untuk langkah seterusnya.


5. Tiga diagram di bawah adalah untuk membentuk bahagian atas bentuk hati.


6. Setelah lengkap, buka lipatan seperti di bawah untuk mendedahkan penanda buku bentuk buku yang telah pun siap.


Selamat berkraf!


Original idea of this tutorial is from The Cheese Thief.


Friday, 22 May 2015

Make a Caterpillar from Egg Carton


This is a simple craft for kindergarten children using recycle material. You can use either plastic egg carton or paper pulp egg carton. Plastic egg carton has a nice round shape to it but paper pulp egg carton is easier to color paint.


You will be needing:
1. Egg carton of your choice
2. Scissor and some strong glue to attach the googly eyes.
3. Googly eyes 
4. Straw (for the caterpillar tentacles)
5. Poster paint (or any type of paint of your choice)


Directions:

Step 1: Prepare the egg carton. Cut around the edges of the round shape. There might be a spikes inside the egg carton. Cut that out. You can train your child to do this but with supervision. 


Step 2: Time for your child to have fun! Paint the egg carton.


Step 3: Let dry overnight.


Step 4: Using strong glue, attach googly eyes. Curl at the end of the straw using glue. Paint and let dry. Make a slit on top of the egg carton and insert the tentacles. 


Done! Enjoy!