Friday, 22 September 2017

DIY Project from Popsicle Stick


Make this simple and super cheap home storage/deco/hexagon wall art with using only popsicle sticks. I got this colorful popsicle stick from Mr. DIY, my favorite store to look for affordable craft supplies. 1 packet of 51 pieces of popsicle stick costs only RM3.90. You'll be needing 2 packets for this project. 

Materials
Popsicle stick
Glue Gun


Instruction
The idea is to arrange the popsicle sticks in a hexagon so it's best if you draw a hexagon shape on a piece of paper to get the right angles and arrange the foundation in that template.

But I'm just going to eyeball the shape here. Glue the end with a glue gun. 


 Layer the sticks. 


Continue stacking and glueing until your hexagon shelf is as deep as you would like it to be. 


With about 100 sticks you'll get as deep as this photo here.


Find the space to place this cute wall art. 


Enjoy making yours today!

Sunday, 3 September 2017

Make your own Air Freshener


Air freshener smells can get overpowering for me sometimes. That’s why I opt for making my own homemade freshener. Au naturel and saves money too.

For this DIY recipes you will need no more than 5 minutes of your time.

Materials


Glass Jar
Baking Soda
Essential oil
Aluminium foil
Ribbon or string
Toothpick (not in photo)


Method
1. Pour a good amount of baking soda in the mason jar.


2. Mix a few drops of your choice of essential oil.


3. Mix thoroughly.


4. Cover lid with aluminium foil.


5. Tie rim of mason jar with ribbon.


6. Make holes on aluminium foil with a toothpick.

Air freshener is ready to be used! Place in rooms, kitchen or even on your office table.

Thursday, 15 June 2017

Five Interesting Facts About Father's Day You Might Want to Know


1. Father's Day cards dates back to roughly 4,000 years ago. Elmesu, a Babylonian* youngster carved a card out of clay to "wish his father a good health and long life.
*Babylon, a famous city from ancient Mesopotamia whose ruins lies in modern-day Iraq.

2. Father's Day is celebrated on the third day of June in many countries of the world. Many Christian countries, such as Spain and Italy, celebrate father's on St. Joseph's instead (March 19).

3. A necktie is among the ultimate gifts for Father's Day. Did you know that neckties could date back on 221 B.C.? When Chin Shi Huang, China's first emperor and founder of the Qin Dynasty, and his famous "terracota army" were discovered, each replica was wearing a necktie.

4. Thailand Father's Day is celebrated on the birthday of the King Bhumibol Adulyadej on 5th of December. Before the king passing on 13th October 2016, everyone will wear yellow to show respect for the king and also celebrate father's by giving them a canna flower.

5. Father's day originated in the United States after Sonora Smart Dodd was inspired by mother's day. It has been celebrated in June since 1910.

So, father's day is just around the corner - it's close enough that you should put some thought to it. But shopping for Dad is hard, I know. 


Aww, please get your Dad something this year just to tell him how wonderful he has been in your life. It's not necessary to buy expensive gifts. A homemade card with a personal message will do.

Why not, for this year, buy your Dad a personalized gift which has a sentimental touch to it. A personal message just for your Dad printed on a special selected gift just so that he look at it every morning or anytime of the day and thought...I'm blessed. 

At Bavakoo Gifts & Crafts you can personalized a regular white ceramic mug with your own unique photo and message.


So the next time your Dad take a sip from this personalized mug, you will always be in his mind. 

Tuesday, 22 November 2016

Bible Verse White Mug

Create your own personalised mug with inspiring bible verse and fill it with treats and give them as gifts for Christmas.
You can fill it with favorite goodies such as;

  • Sachet of tea bags
  • Mini size chocolate or mini marshmallow
  • Candy or nuts
  • Cookies
  • Mini bubble bath with sleep mask or
  • Lip gloss or nail polish
Order our mugs for that someone special by email feliciawilliambinsol@yahoo.com or whatapps at 019-5231445.

Monday, 21 November 2016

Bible Verse White Mug


-With God Nothing is Impossible-Matthew 19:26
Faith-based Christian gift is the perfect gift for family and friends to show them how special they are and how important Christianity is in our lives.
Bible Verse or christian gifts are definitely special because they extend our love to others while showing Christ’s love to us.
Personalised your mug with your favorite bible verse for only RM28.00.
Email me at feliciawilliambinsol@yahol.com or whatapps at 019-5231445 for more details. 

Thursday, 19 May 2016

Retro Mug Design


For 2 days now was thinking about mug theme design for my aunt. Alas, I choose the retro design. With ornamental background and retro font, I hope she likes it. I always show mock up design to my customer in order for them to understand and know what to expect when the design is printed on mugs.

To order your personalised mug head over to Bavakoo Gifts & Crafts and choose pre-made template for all occasion.


Wednesday, 13 April 2016

Silky & Plush Pillow for Moms


Done a few cushion pillow mockup this week. Mother’s day is coming soon and whoever is looking for a personalised one-of-a-kind gift for your lovely mom heads over to Bavakoo Gifts & Crafts to order yours.


Measuring 40cm x 40 cm, this silky soft pillow available in white, purple, light blue, black, brown, orange, red, pink, yellow and green. Material is made from 100% polyester and weight approximately 350g. It has a hidden zipper and the inner cushion is made from microfiber.You can customized the design using your own photo and message and simply use our design with full colour printing.

If you don’t have time to make a nice homemade gift for your mom or you don’t even know what to give, choose this unique and personalised gift and custom made it with photo of your mom with a personal and sentimental message.
  
~A mother is she who can take the place of all others but whose place no one else can take~

Wednesday, 2 March 2016

Nesting Storage Containers


Materials and Tools
* 30cm x 30cm sheets of thick scrapbook paper or patterned paper
* Brown satin ribbon
* Green rope cord 
* Metal ruler
* Bone folder
* Scissors
* Small hole punch


1. SCORE PAPER

Measure 5cm from edge of the patterned paper, then with a bone folder, score a line along the edge of metal ruler. Repeat with the three remaining sides, running each score line all the way across the paper.


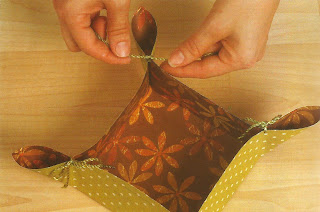
2. FOLD SIDES AND PINCH CORNER

Fold up the sides of the box along the scored lines. Pinch together one corner where the scored lines intersect, as shown.


3. PUNCH HOLE THROUGH CORNER

While still pinching the paper together, punch a hole through the corner point.


4. SECURE CORNER WITH RIBBON

Run a length of satin ribbon through the hole, then tie it in a bow to secure the corner. Pinch, punch and tie the three remaining corners.


5. CREATE A SMALL CONTAINER

Trim one sheet of the patterned paper to 23 cm x 23cm. Repeat steps 1-4 with this paper to create a smaller nesting container, this time using green cording to secure the corners. When finished, place the smaller container in the larger one, or fill each container as desired.

Happy Crafting!

*Tutorial from the book Paper Everyday by Laurie Dewberry. 

Wednesday, 17 February 2016

Tips to Paint on Mugs

There are lots of DIY tutorial online on how to paint your designs on mug. It's an ideal personalised gift without spending much. But after a few time using it the designs will go away. Here are few tips and tricks to make sure your designs last longer. 

1. Go for a cheap mug with glaze.


2. Draw on your designs twice, leave to dry between each drawing.

Source


3. Allow ink to completely dry before placing in oven.


4. Oven temperature should be 220°.


Source


5. After baking, leave to cool inside oven.


6. For long lasting designs, make sure you hand wash only.

Source

Happy Crafting!

Thursday, 10 December 2015

Easy and Cheap DIY Christmas Wreath

Christmas is my favorite season to diy. All the endless possibilities to create christmas decorations out of all kind of paper; patterned paper, tissue paper even newspaper just excites me. 

I always want to make a Christmas wreath. Found tons of tutorial online but this one can be done within 1 or 2 hours.

Tutorial are from http://www.dltk-holidays.com/xmas/mplatewreath2.html

Materials:
  • paper plate (I cut a circle out of used cardboard box)
  • glue,
  • scissors,
  • 1 to 2 inch squares of green or red (or your choice of color) tissue paper.

Instructions:

  • Cut the tissue paper into 1 to 2 inch squares.
  • Cut the center out of the paper plate to leave a round "donut" shape.  This will form the base of the wreath.
  • Wrap each square of tissue paper over the top of a pencil, dip in glue and stick it to the paper plate.
  • Continue until you have filled the entire plate with tissue to create your wreath.
Glue ornaments on the finished wreath. I got my ornaments at Mr. DIY where you can find affordable Christmas decorations.

Enjoy making yours!


Wednesday, 12 August 2015

Bagaimana membuat Pasu Bunga yang murah dan unik!


Bagi sesiapa yang sukakan DIY dan juga sukakan bunga, idea ini sangat mudah dan mengambil masa yang amatlah tidak panjang. Sekarang tidak perlulah membeli segala pasu bunga yang fancy bagai, anda hanya perlu custom kan barang-barang yang ada di rumah mengikut kreativiti anda sendiri.


Sumber


Bahan-bahan yang diperlukan;

1. Tin makanan (bole guna tin tuna atau tin susu junjung, kalau mau yang comel gunalah tin tuna)

2. Penyepit kain yang diperbuat daripada kayu (yang ni rasanya di Malaysia dah jarang orang jual penyepit kain yang diperbuat daripada kayu kecuali di kedai yang menjual barang-barang dari China. Kalau tidak ada yang kayu yang diperbuat daripada plastik pun boleh)


3. Bahan-bahan untuk menanam bunga seperti tanah dan biji benih. 


Cara-cara (tengok dari gambar lagi senang kan...)

1. Sepitkan penyepit kain di sekeliling tin makanan.
2. Tanam bunga di dalam tin.

Boleh juga gunakan pasu bunga ini sebagai candle holder atau pemegang lilin. Gunakan tea light (lilin yang biasa orang gunakan dalam aromatherapy) atau apa jenis lilin pun boleh.


Sumber


Jika menggunakan penyepit kain plastik nampak lagi colourful kan?

Pasu bunga macam ini amatlah sesuai ditanam dengan pokok herba. Bolehlah simpan di belakang dapur dan jika hendak masa cuma petik saja. 


Sumber

Kalau ada yang mau menghiaskan penyepit kain yang memang tidak ada corak itu, boleh gunakan glitter. 


Sumber


Atau boleh juga menggunakan butang untuk menghias.


Sumber

Gunakan warna air untuk warnakan permukaan penyepit kain.


Sumber


Atau lebih senang, gunakan washi tape untuk menghias pasu bunga tersebut. Washi tape boleh didapati di kedai-kedai buku atau kedai kraf.


Idea lain selain daripada penyepit kain boleh juga mengguna ranting-ranting kayu yang ada di sekeliling rumah. Gunakan tali yang lebih kurang sama warnanya dengan ranting kayu dan ikat keliling sebagai sokongan.


Sumber

Selamat mencuba!